
Transforming Our Home: The DIY Journey of Our Modern Kitchen Extension
Embarking on a home renovation journey can be both exhilarating and challenging. When we decided to expand our kitchen, we chose a slightly unconventional path: a shell-only contract with our builders. This strategic decision meant that while the structural integrity of our new kitchen extension was expertly handled and erected with impressive speed, the vast majority of internal finishing work fell squarely on our shoulders. It was a conscious choice aimed at maximizing cost savings, allowing us to allocate our budget more effectively to key design elements and quality finishes.
While undoubtedly a significant undertaking, tackling the interior ourselves has resulted in substantial financial savings, making our dream kitchen more attainable. However, this hands-on approach naturally translates into a slower pace of progress. All the painting, plumbing, flooring, and kitchen unit installations have been meticulously squeezed into evenings, weekends, and precious holiday periods. This year, our summer break was less about relaxation and more about rolls of paint and power tools – a testament to our dedication, but also a vivid reminder of the commitment required for such a project.
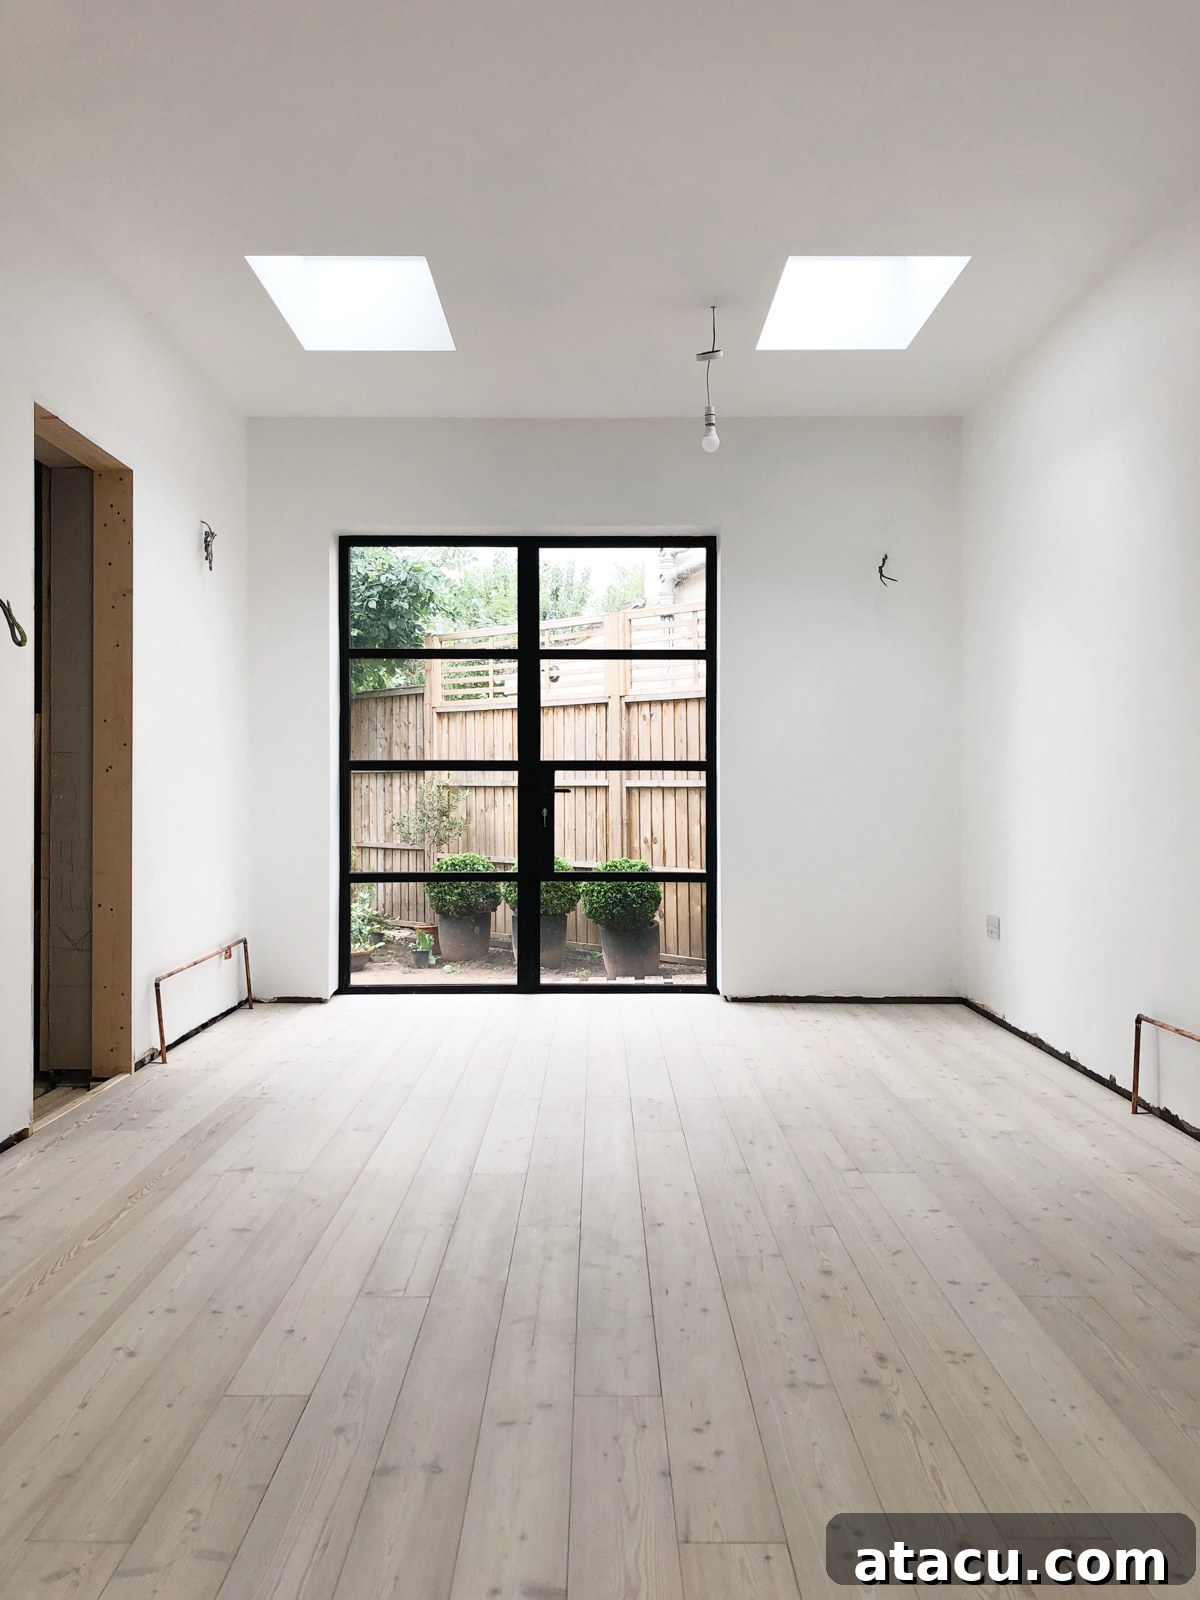
Our journey began with a blank canvas: a rough concrete subfloor and newly plastered, albeit bare, walls. The initial phase saw Graham, with his expert plumbing skills, meticulously installing all the necessary pipework, laying the groundwork for a fully functional kitchen. Simultaneously, I took on the task of painting the extensive wall surfaces, preparing them for the transformation ahead. Once these foundational elements were in place, our collaborative efforts shifted towards the exciting stages of fitting the flooring and assembling the core kitchen units.
For several months, living without a proper kitchen has certainly tested our culinary creativity and patience. Since the demolition of our old kitchen, our temporary setup has been basic, to say the least: a single electric hob, a trusty microwave, and a provisional sink located in what will eventually become our dedicated utility room. It hasn’t been glamorous, but it has been a journey of resilience and adaptability. As the project finally nears completion, the thought of never having to rely on another microwave-ready meal again is a truly motivating prospect. The finish line is in sight, and the promise of a fully functional, beautifully designed kitchen makes every challenging moment worthwhile.
Designing a Luminous and Open Kitchen Space
The conceptualization of our kitchen extension’s layout and aesthetic has been a journey in itself, a topic I delved into previously in this planning post. From the very beginning, our paramount objective was to craft a space that felt inherently light, airy, and expansive. We envisioned a kitchen that wasn’t just functional but also a true sanctuary, bathed in natural light and exuding a sense of calm and openness.
One of the most remarkable features of the new extension is the exceptional quality of light it receives. Daylight generously streams in from multiple directions: through large windows at both the front and the back of the room, as well as from strategically placed roof lights above. This multi-directional light flow ensures that the space is beautifully illuminated throughout the day, creating a bright and inviting atmosphere regardless of the weather outside. The interplay of light and shadow dynamically transforms the room, adding depth and character.
Further enhancing this feeling of spaciousness is the elegant vaulted ceiling. This architectural choice not only adds significant height, creating an impressive vertical dimension, but also amplifies the overall sense of openness. The soaring ceiling draws the eye upwards, contributing to an uncluttered and airy feel that is central to our design philosophy. With such a dramatic overhead canvas, I am incredibly excited about the prospect of selecting a striking statement lighting fixture to suspend from the apex, an element that will undoubtedly become a focal point and a true conversation starter in our finished kitchen.
Selecting the Perfect Foundation: Our Modern Scandi Larch Flooring
When it came to flooring, the conventional wisdom often dictates maintaining a consistent aesthetic throughout a home for a cohesive look. While we adore the beautiful oak herringbone flooring we chose for our living room, we made a deliberate decision to deviate from this path for the kitchen extension. This choice was multifaceted, driven not only by cost considerations – as quality oak can be a significant investment – but also by the desire to allow the new extension to establish its own distinct identity. The extension possesses a unique architectural character and feel, and we wanted the flooring to accentuate this modern divergence from the older part of our home.
To achieve this, we opted for a light, contemporary Scandi-style floor, seeking a material that would contribute to the bright and open atmosphere we envisioned. Our search led us to untreated brushed larch from Russwood, a supplier that impressed us with their exceptional customer service and invaluable advice. Their expertise proved instrumental in guiding our selection, ensuring we made an informed decision that aligned with both our aesthetic goals and practical requirements.
Larch, although technically classified as a softwood, boasts impressive properties that often challenge this categorization. It possesses a remarkable toughness and durability, performing much closer to a hardwood than many other softwoods, making it an excellent choice for high-traffic areas like a kitchen. Visually, larch offers a similar appealing aesthetic to Douglas Fir but comes with a significantly more attractive price point, allowing us to achieve our desired look without overstretching our budget. Its natural grain and pale tones are perfectly suited for the clean, minimalist Scandi design we were aiming for.
The finishing process for the larch flooring was a labor of love, requiring meticulous attention to detail to achieve the exact look we desired. We replicated the successful finish we used on the flooring in our bedrooms, starting with an application of Woca lye. This crucial step serves to lighten the wood, effectively neutralizing any unwanted yellow undertones and preparing it for a fresh, muted appearance. Following this, we applied a couple of layers of Osmo Polyx Oil. We began with a coat of 3040 White, which further enhanced the light, bleached effect, and then sealed it with 3044 Raw as the top coat for a natural, matte finish. This multi-step process, while time-consuming and labor-intensive, was invaluable in allowing us to achieve the precise, bespoke finish that perfectly complements our modern Scandi kitchen design. The effort was undoubtedly worth it for the beautiful, durable, and unique floor we now have.
Elevating Design with Crittall-Style Patio Doors: Functionality Meets Aesthetics
One of the most impactful design decisions we made for our kitchen extension was the selection of our patio doors. We were captivated by the timeless elegance and industrial chic appeal of Crittall-style doors, and after extensive research, we chose the Aluco Elegance range. These stunning doors were expertly supplied and fitted by Cherwell Windows, whose professionalism and attention to detail were exemplary throughout the process.
Our decision to opt for aluminium doors over traditional steel Crittall options was a pragmatic one, balancing aesthetics with crucial performance factors. Aluminium offered significant advantages in terms of both cost-effectiveness and, perhaps most importantly for a modern extension, superior thermal efficiency. This ensures our new kitchen remains warm in winter and cool in summer, contributing to a comfortable living environment and potentially reducing energy bills. While steel certainly has its charm, the benefits of aluminium made it the clear winner for our project, proving that style doesn’t have to compromise on practicality.
Designing the Crittall-style doors wasn’t a quick decision; it involved a thorough process with numerous design considerations. The hallmark of these doors lies in their distinctive grid patterns and slim profiles, and achieving the perfect balance of proportions was paramount. We spent a considerable amount of time meticulously finalizing the design, ensuring that the division of glass panels and the overall scale would integrate harmoniously with the larger architectural vision of our extension. This careful planning was essential to realizing the full potential of their aesthetic impact.
It’s no secret that high-quality, bespoke doors like these represent a significant investment, consuming a substantial portion of our overall budget for the space. However, reflecting on the completed installation, we can unequivocally say it was an investment totally worth making. The doors not only flood the room with natural light and offer expansive views of our garden, but they also serve as a striking architectural feature, defining the character of the extension. We absolutely love the contemporary edge and sophisticated charm they bring to our kitchen, truly transforming it into a standout space.
Smart Choices for Kitchen Units: IKEA Base with Custom Fronts
The selection of kitchen units was another area that involved considerable deliberation and research. We aimed to achieve a high-end, custom look without the prohibitive price tag often associated with fully bespoke cabinetry. Our solution was a clever hybrid approach: we decided to purchase the robust and affordable base units from IKEA, known for their modularity and ease of assembly. To elevate the aesthetic and inject a personalized touch, we then ordered custom doors, plinths, and drawer fronts from Husk, a company specializing in bespoke fronts for IKEA frames.
The installation of the IKEA units themselves proved to be remarkably straightforward. With a bit of teamwork and following the comprehensive instructions, we managed to assemble and fit all the base units over a single weekend without encountering any significant difficulties. This DIY approach not only saved us further installation costs but also gave us a greater sense of accomplishment in building our dream kitchen from the ground up.
However, for anyone considering fitting an IKEA kitchen, there’s a crucial detail to be aware of: their units do not typically feature a standard service gap at the back. We had been forewarned about this design characteristic, which allowed us to plan accordingly and didn’t cause any issues for our specific layout. Nevertheless, it’s an important consideration for others, as the absence of this gap might necessitate more complex plumbing or electrical adjustments in certain installations. Always measure and plan meticulously when working with IKEA kitchen systems to ensure seamless integration.
In line with our desire for an open and uncluttered aesthetic, we made the conscious decision to forgo traditional wall cabinets. Instead, we plan to install elegantly designed open shelving, which will serve as both functional storage and a stylish display area for our cherished tableware pieces and decorative items. This approach contributes to the overall spaciousness of the room and allows the beautiful light to flow more freely. Furthermore, we thoughtfully incorporated numerous electrical points for future wall lights during the initial wiring phase. This foresight means we have ample flexibility for various lighting schemes, though the exciting decisions about the final light fixtures still lie ahead, promising to add yet another layer of personality to our evolving kitchen.
For those who might be curious about the boarded-up opening positioned above the plumbing for what will become our main sink unit, we can confirm that, yes, this space is indeed destined to become a window. However, we have something quite distinctive and a little unusual planned for this particular feature. It’s a design element that we believe will add a unique touch and unexpected character to the kitchen. Keep an eye on our upcoming updates to see how this intriguing idea unfolds!
Crafting Our Dream Kitchen: The Moodboard Inspiration
Every successful design project begins with a clear vision, and for our kitchen extension, this vision was meticulously curated on a comprehensive moodboard. This invaluable tool allowed us to coalesce our ideas, compare materials, and ensure every element would contribute to the cohesive, modern Scandi aesthetic we were striving for. It helped us visualize how different textures, colors, and functional pieces would interact, solidifying our design choices long before any physical installations began.
1. Wall light – Inspyer Lighting: Chosen for its industrial-chic aesthetic and adjustable functionality, perfect for task lighting or ambient glow. | 2. Radiator – soak.com: A sleek, modern design that offers efficient heating while blending seamlessly with the minimalist decor. | 3. Door – Doors To You: An internal industrial-style door echoing the Crittall patio doors, ensuring design consistency throughout. | 4. Worktop – Caesarstone: Selected for its renowned durability, low maintenance, and sophisticated appearance, providing a practical yet elegant surface. | 5. Tap – Abode: A brushed brass single-lever tap, adding a touch of warmth and luxury to the otherwise cool palette, chosen for both style and functionality. | 6. Kitchen units – Husk: Custom fronts for IKEA units, allowing us to achieve a bespoke look with a wider range of finishes and colors, perfectly complementing our Scandi design. | 7. Pendant light – Heal’s: Envisioned as a statement piece for the vaulted ceiling, providing ambient light and a striking visual element. | 8. Mug – Sue Pryke: Representing the desired minimalist yet handcrafted tableware and accessories that will adorn our open shelves, adding personal touches to the space.
The Final Stretch: Appliances, Worktops, and Finishing Touches
As our kitchen extension project marches towards completion, a series of exciting, yet crucial, tasks remain. One of the immediate priorities is the installation of the column style radiators we’ve carefully selected from soak.com. These are not merely functional heating elements; they are chosen to precisely match the classic column radiators we’ve already fitted throughout the rest of our home, ensuring a harmonious and consistent aesthetic across all living spaces. This attention to detail reinforces the cohesive design narrative of our renovation.
Another significant step involves fitting the internal door that will connect the new extension to the older part of the house. Our choice for this is a striking black industrial style door. This decision is far from arbitrary; it’s a deliberate design echo, mirroring the sophisticated grid patterns and bold lines of our Crittall-style patio doors. This subtle yet powerful visual connection unifies the spaces and reinforces the contemporary, industrial-inspired elements of our design. Choosing the right door is about more than just privacy; it’s about making a statement that complements the overall architectural language.
Beyond these installations, the grand task of selecting appliances and worktops awaits. This phase requires a thoughtful balance of aesthetics, functionality, and budget. We’ll be meticulously researching everything from energy-efficient ovens and induction hobs to integrated dishwashers and quiet refrigeration solutions, ensuring each piece not only performs flawlessly but also integrates seamlessly into our minimalist design. Similarly, the choice of worktops is critical – a decision that will weigh durability, maintenance, and visual impact, aiming for a surface that is both beautiful and resilient enough to withstand the demands of a busy kitchen.
Indeed, there’s plenty to keep us engaged and busy over the coming weeks as we meticulously work through this final checklist. However, the excitement is palpable. Seeing our vision steadily materialize, witnessing the bare shell transform into a functional and stylish heart of our home, is immensely rewarding. We are finally getting there, and the anticipation of cooking and entertaining in our new, thoughtfully designed kitchen is growing with every completed task. This journey, though arduous, is on the verge of its triumphant conclusion.
Reflecting on Our Kitchen Extension Journey: Tips for Your Renovation
Our kitchen extension project has been a testament to the power of careful planning, dedicated DIY effort, and strategic material choices. Opting for a shell-only contract, while demanding, allowed us unprecedented control over the interior finishes and resulted in significant cost savings. This approach isn’t for everyone, as it requires considerable time commitment and a willingness to learn new skills, but for us, the rewards far outweighed the challenges.
Throughout this journey, we’ve learned invaluable lessons that we hope can inspire and guide your own home improvement projects. Firstly, don’t underestimate the impact of natural light and thoughtful design in creating a truly transformative space. Our vaulted ceiling and multi-directional windows are prime examples of how architectural features can elevate the everyday. Secondly, consider unconventional material choices. Larch flooring, for instance, offered the durability and aesthetic we desired at a fraction of the cost of traditional hardwoods. Always explore alternatives that align with your vision and budget.
Finally, remember that patience is key in any renovation. There will be delays, unexpected hurdles, and moments of doubt, but the satisfaction of seeing your vision come to life through your own efforts is unparalleled. Whether you’re considering a full extension or a smaller remodel, meticulous planning, embracing a blend of DIY and professional help, and staying true to your design goals will undoubtedly lead to a space you truly love. We can’t wait to share the final reveal of our kitchen extension, a space that truly reflects our style and hard work.